No matter how many amazing dishes I taste, the basics from my childhood are always the hearty dishes that make you feel good with every bite. As a kid the taste of fresh Village bread and butter or a thick layer of shmaltz topped with some salt and pepper would always be a welcome snack during play breaks.
Since then however, bread has changed. With the development of bread improver and dry yeast making bread became easier but lost its rustic touch and flavour. But fear not, Traditional Sourdough Bread is making a comeback and old traditions and methods are being rediscovered by younger generations.
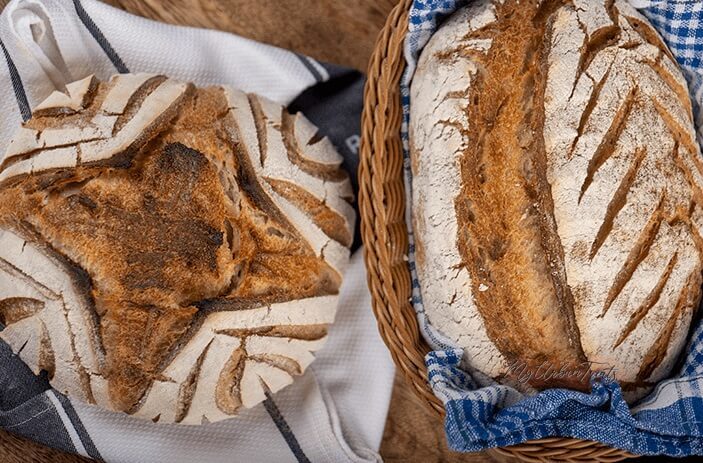
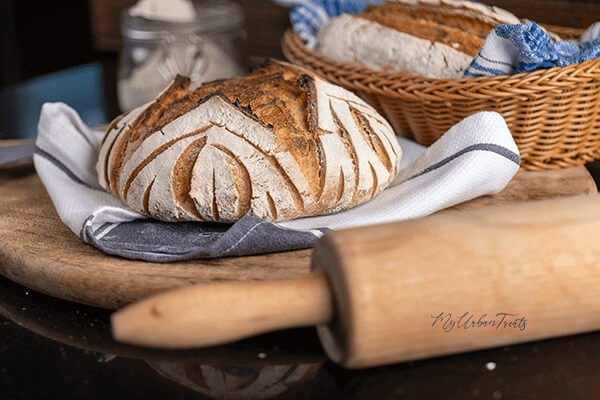
For this weeks recipe we invited guest master baker Balázs Borzon to teach us his traditional Sourdough Village Bread method a perfect combination for our Hungarian Sausage Recipe. Balázs is a professional baker who is very passionate about his work and looking at his bread designs you could even call it art. It came as no surprise when I found out he is also a great digital artist. Make sure you check out his Instagram and Etsy page at the end of this article.

Sourdough Starter for Traditional Village Bread
This recipe is based on Sourdough Starter. If you haven’t made Sourdough starter before make sure you read our tutorial on making sourdough starter. It’s a process that takes between 8 and 10 days and requires you to ferment a flour mixture with water and feed it for the whole duration. Some important tips when making sourdough starter are
- Use quality ingredients
- Watch the temperature as it can make or break your starter
- Make sure your jars are clean
- Filter water for sourdough starter
Once you have made a batch of sourdough it can live with you as part of your family. Every time you make a batch of bread, you keep a small batch of starter and feed it to regrow the amount this way you always have starter ready for baking. Some people go as far as naming their sourdough starter (well I did)
Autolyse for a great result
Autolyse is a process that engages enzymes and gluten development and builds stronger connections between them before the kneading process begins. Autolyse creates several important reactions.
- Dough Hydration: Autolyse hydrates the starch and proteins of the flour
- Gas Retention: Protein bonds create more gluten resulting in a better gluten structure and a better hydrated dough
- Flour enzymes break down protein bonds resulting in a dough that holds its shape better and is stronger.
- Autolyse smoothens your dough faster and makes it less tacky
Slapping, Folding, Resting
Making village bread is definitely a patience game so don’t rush and take your time in every step of the way. Our first step is the slapping method. Slapping wet dough has a few effects on the dough. Firstly it will trap more air in the dough, more air results in more bubbles so that’s always a good thing when making village bread. Secondly it will make the dough more malleable. The dough might feel tacky and too wet when you start. DON’T add more flour, the slapping technique will tighten it up (along with the salt)
The next important step is resting, you will see in the recipe that there are a ton of resting pauses. This is important as it gives a chance to the dough to ferment and rise. There is also such a thing as “too much rest” for example when proofing in the fridge going beyond 24 hours of proofing has no benefit and it might actually take away from the flavour and texture of the dough.
Last but not least, folding. Folding has a few functions in the process. It traps more air in the dough and creates surface tension in the shaping stage which is important for an even and smooth rise.
Baking: Temperature and Containers
I have tested three different baking methods and will describe all three here. A) Just baking in the oven with extra steam B) Bake on a Pizza Stone C) Bake in a closed container.
Out of the three, baking in a closed container definitely had the best results. This was expected, as it encloses all the steam and hydration and doesn’t allow it to escape. You can use a ceramic or oven safe glass container with a lid. We used a pyrex casserole dish. However A and B also did a great job so don’t worry if you don’t have a closed container.
Baking without Pizza Stone worked well, we added a small ceramic dish and filled it with cold water and a few ice cubes. This created steam during the baking process and kept the dough hydrated. This had a similar result as baking on the pizza stone (we also used water and ice for this method)
Baking Times and Temperature for A & B
Preheat oven at 250 C or 480 F bake at this temperature for 20 minutes. Then reduce the temperature to 220 C or 430 F and bake for another 20 Minutes.
Baking Times and Temperature for Closed Container (Dutch Oven)
Preheat oven at 250 C or 480 F and bake with closed lid for 30 minutes. Then reduce to 220 C or 430 F and bake for another 20 Minutes.
Time to Bake Traditional Village Bread
Get your ingredients ready (make sure you prepare the sourdough starter first) and get baking.
A big thank you to our guest this week Balazs. Make sure you check out both his instagram accounts.
Borzon Art and Borzika
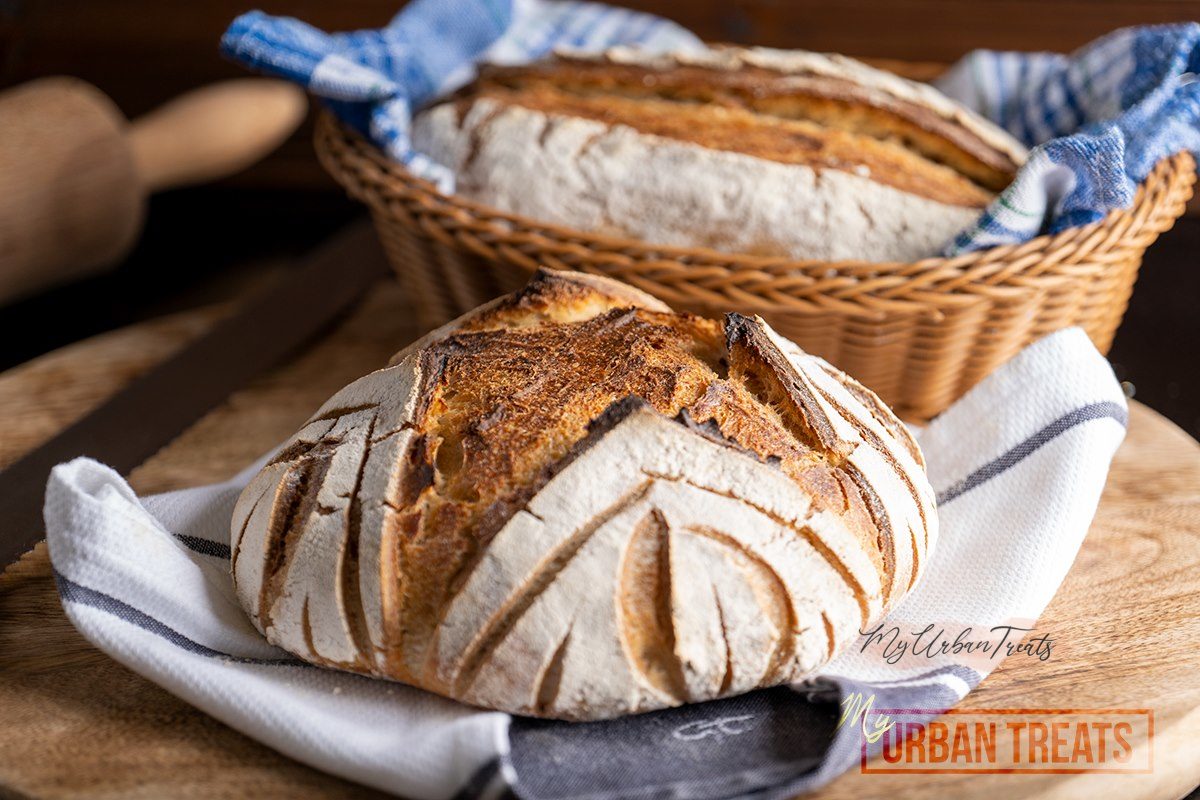
Artisan Village Bread
Equipment


Ingredients
- 7 ½ Cups Village or Artisian Flour
- 2 ½ Cups Warm Water
- 1 ⅓ tbsp Salt
- ½ Cup Sourdough Starter
Instructions
- Autolyse is a biological process that breaks starches into sucrose. This will make your dough more malleable and will give you a better rise and texture. The process is simple, combine the water with the dough and mix until its smooth and even. Cover with a kitchen towel and let it rest for at least 30 minutes. You will notice a more elastic texture once completed.
- Now it's time to add the sourdough starter. Read our Sourdough Starter Guide to ensure you have an adequate amount of starter left to continue the growth and feeding process. Add your Sourdough starter to the autolysed flour and water mixture. Using the dough hook of your stand mixer, set to a low speed and let it knead until it is well combined. At this stage the dough might seem too runny, this will tighten up when we add the salt. Add your salt and knead for another 5-10 minutes until smooth and well combined.
Slap,Fold and Shaping
- Now that all the ingredients have been combined and the autolyse is complete, we need to prepare the dough for the kneading and folding process. This process is called slapping and lasts for 3 to six minutes. Pick the dough up with both hands and slap it against the kitchen counter. Pull it lengthwise and roll it back together. Then pick it up and slap it against the counter again. Repeat this process for 4-5 slap and stretches. Don't hold back you need to use strength otherwise it will take you longer to finish this step. You will know the dough is ready when its nice and smooth and not as tacky as it was when you started.
- Place the dough in a bowl and cover with a kitchen towel. Find a nice and warm spot and let it rest for 30 minutes. Avoid heat above 70C or 140F as this will kill your sourdough starter. Also avoid direct sunlight shining on your dough.
- Now that the dough is well rested and has recovered from the slapping process it is time to fold it for the first time. Place your dough on your working surface. To avoid it sticking you can use a few drops of olive oil on the surface and on your hands. <br/> Pull the dough out in to a rectangle about 40 x 30 cm or 15 x 11 cm. Fold both sides to the center along the long side. Then roll it up. Handle the dough gently from here on. Place it back in to the oiled bowl and cover for another 30 minutes.
- Repeat the folding process and let the dough rest for another 30 minutes.
- Repeat the fold again, only this time we let the dough rest for 1 1/2 hours instead of 30 minutes.
- At this stage you should already see a significant amount of rise in your dough. Very lightly flour your working surface. Place the dough on the floured working surface and fold it from the sides on to the top in to itself. This will smoothen out the underside of the dough. Place it on an area that doesn't have a lot of flour. Using both hands, lightly pull the dough to your direction. This will create surface tension. Turn the dough by a quarter and repeat four times. Line your proofing basket with a clean kitchen towel, dust with flour and place your dough in to the proofing basket. At this stage you have two option.
Option One – Proof and Bake
- Rest the dough in a warm place for 2 – 3 hours.
- Preheat your oven at 240C or 465F. The best way to bake this type of bread is in a ceramic or pyrex covered casserole dish. This keeps all the liquid trapped and gives you a crunchy crust. If you don't have a dish that fits your loaf, don't worry. You can still bake it in your oven but you will need some steam to keep the bread moist. You can achieve this in a few ways, you can get a small oven safe dish and fill it with water. Then place it in the bottom of your oven to create a constant flow of steam. You can also add a few ice cubes. I like to use a plant spray bottle filled with water and spray a good amount of mist in to the oven before i add the dough.
Option Two – Overnight Fridge Rest
- Instead of proofing your dough at room temperature, you can proof it in the fridge in a slower process. This takes between 15 and 20 hours although we found that 16 is Ideal. The benefit of fridge proofing is that you have more control over when you can bake the bread. Don't let your bread proof more than 24 hrs. There is no benefit in an extended time and it might diminish the flavour of the bread and dry it out.
- The Baking process is the same as in option one.