Triple Chocolate Cake
Chocolate, Chocolate and More Chocolate. Simply Delicious!
Ingredients
CAKE BATTER BASE
- 3 cups All-purpose flour
- 2 ½ cups Crystal Sugar
- 3 tsp Baking Powder
- 1 tsp Salt
- 1 ½ cups Butter Milk
- ¾ cup Vegetable Oil
- 3 large Egg
- 2 tsp Vanilla Extract
BROWNIE LAYER
- ¾ cup Cocoa Powder
- ⅓ cup HOT Water
- 1 Shot Espresso
MILK CHOCOLATE LAYER
- ½ cup Milk Chocolate
WHITE CHOCOLATE LAYER
- ½ cup White Chocolate
BUTTERCREAM
- 1 ⅔ cups Butter
- 2 cups Powder Sugar
- ½ cup White Chocolate
- ½ cup Milk Chocolate
- ½ cup Dark Chocolate
Makes: 8inch round, 3inch height
Instructions
- Combine all dry ingredients in a mixing bowl and blend for a minute. Then add your wet ingredients starting with the buttermilk, vegetable oil, eggs and vanilla extract. Whisk at medium speed for 6-7 minutes. Now evenly separate in three mixing bowls. I found that this equals about 500ml per bowl but feel free to measure and double-check.
- These layers follow the same method so just repeat with each chocolate flavour. Melt the Milk and White chocolate in separate bowls. You can do this in Bermarie or in the microwave. If you are going to microwave your chocolate, do it in 30 seconds bursts. Stir and zap until all the chunks have dissolved. Let the chocolate cool to room temperature before the next step.While folding the batter add in the chocolate and fold quickly. If your chocolate was too hot it can cause chunks but don't worry they still taste great in the cake ;).This cake is sticky so line your baking pan with baking paper and bake at 175C or 350F until baked. This takes about 45 to 55 minutes depending on your oven. Do a frequent skewer test to ensure its cooked all the way through.
- This layer is a little different. While mixing the base batter at medium speed, add the shot of espresso. Sift in the cocoa and then carefully add the hot water while whisking. The Hot water will dissolve and flower the cocoa powder for a great and rich taste. Espresso enhances the chocolate flavour. Bake at 175C or 350F until a wooden skewer test comes out clean from the centre.
- Cream the butter until light and fluffy. Then whisk in the icing sugar in small batches. Whip for 5-6 minutes until your buttercream is smooth. Split into three equal parts, leaving one part in the mixing bowl.You are best off starting with the white chocolate cream as this will keep the colour nice and clear and you won't need to wash your mixing bowl after every mix.Melt your chocolate in three separate bowls using a microwave. Let the chocolate cool to just above room temperature. While whisking the buttercream on medium/high speed gradually add in the white chocolate. This needs to be rather quick to avoid chocolate clumps. Set the white buttercream aside and repeated the process with the Dark Chocolate and then with the Milk Chocolate.
- To assemble your layers, simply add equal amounts of each buttercream between each layer. I used three full ice cream scoops for each layer. I started with White, Milk and then Dark but its really up to you. Add a crumb coat of buttercream and let it rest in the fridge to settle. Approximately 20-30 minutes.
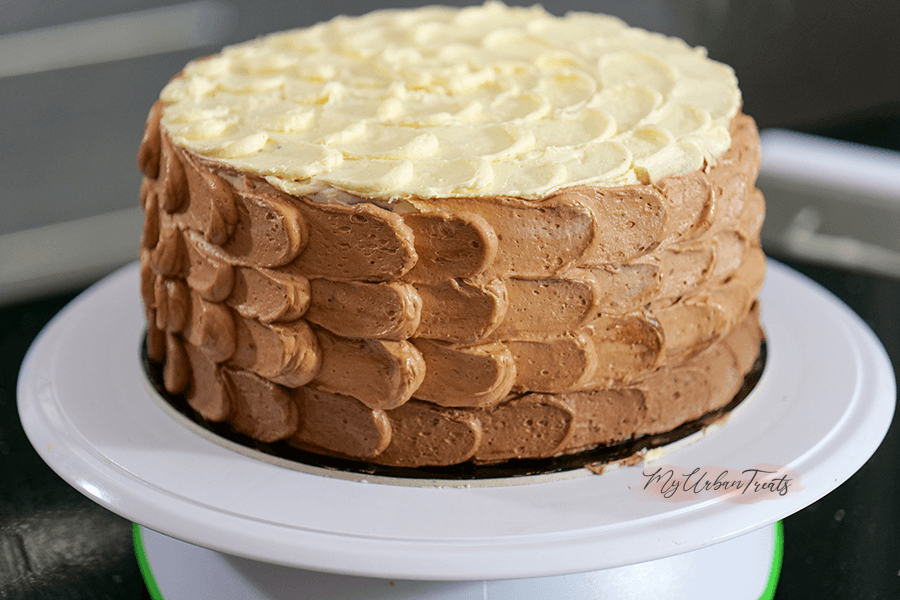
- As amazing as the pattern looks, it's super easy to achieve. Using a piping bag with a large open piping tip add a blop of Buttercream. Using a palette knife or even a butter knife pull the blog sideways starting in the middle lightly pressing down. Repeat in the equal distance around the cake. Then start with the next row, depending on how much buttercream you have you can add multiple rows of icing. Repeat on the top of the cake with the same methods but in and inwards spiralling circle.
Video
Nutrition
Serving: 1Slice | Calories: 959kcal | Carbohydrates: 132g | Protein: 16g | Fat: 46g | Saturated Fat: 21g | Cholesterol: 52mg | Sodium: 384mg | Potassium: 456mg | Fiber: 4g | Sugar: 88g | Vitamin A: 136IU | Vitamin C: 1mg | Calcium: 201mg | Iron: 6mg
